Showing posts with label battle reports. Show all posts

Friday, December 09, 2016

+ KINGS TOURNAMENT REPORT +

Blogosphere! I haven't played a ton of KOW this year, and I haven't written about all my games, but I did do a writeup for the Crossroads GT back in September, which you can check out here on Dakka. And as a bonus here's another tournament recap, from last weekend!

+++ +++

After a night of clubbing last Friday (Dec 2), I got two hours of sleep and then was whisked away by a couple clubmates to Manchester, CT for a three round single dayer at The Portal – which is a fantastic game store with sooooo much gaming room it’s scary.

I took my smelly green Ratkin, cooked down from the latest 2500 to a very grindy 2000:

NURGLEKIN 2000

War Chief – the boomstick
Blight Lord – bane chant, wings of honeymaze
Blight Lord – bane chant

Blight Horde – fire oil
Blight Horde
Blight Horde
Blight Horde
Brute Regiment
Brute Regiment
Death Engine – vile sorcery

I had serious misgivings about dropping my Warlocks – I’m usually rocking along at 10-15 lightning shots – but I really love my four Rackham apostates and wanted to use them all again. The flying character was also a very new concept to me, intended to address all the things flying punchy heroes do, at a hefty price tag (like 160 pts!)

+++

ROUND 1: INVADE

RATKIN

Demonspawn – wings
War Chief on Fleabag – two-handed weapon, blade of the beast slayer
Warlock – bane chant, inspiring talisman

Shock Troop Horde – brew of haste
Blight Horde – brew of strength
Brute Horde – brew of courage
Tunnel Slave Horde
Tunnel Slave Regiment
Vermintide Regiment
Vermintide Regiment
Death Engine – vile sorcery

I liberally applied Monster Rehab to myself and then racked up for a civil war against a beautiful army and deliciously atypical list – i.e. another rat army with zero weapon teams!

While my rats tend to do pretty poorly at Invade (due to castling and relying on shooting), grabbing first turn and knowing this list wanted to grind meant I could shove forward early:


 And grind we did, especially in the center:


His heavy flank was initially a concern, with Vermintide > Brutes > Demonspawn stacked to give each other cover from my Death Engines, but once combat happened things started to slide sideways for him:


Those Brutes held up the Demonspawn for waaaaaay longer than they should have, giving the Death Engines time to hold and flank the Brutes, then double (hindered) charge the Demonspawn into the ground. Props lil'’ Brute regiment!

End game saw our armies reduced to almost identical units:


2 Death Engines, 1 Blight horde and 1 War Chief for both of us … however all of my Blight Lords were alive and on his side, tipping our Draw to my favor by a point.

DRAW (11-9)

Great match and my first time playing against Ratkin. Victory burritos followed.

+++

ROUND 2: PILLAGE (7)

DWARFS

Stone Priest – bane chant, inspiring talisman
Stone Priest – bane chant
Warsmith
Army Standard Bearer

Berserker Brock Rider Regiment – brew of sharpness
Earth Elemental Horde – brew of strength
Ironclad Horde – amulet of thorns
Ironclad Horde – brew of courage
Berserker Regiment – blessing of the gods
Ironwatch Crossbows
Ironwatch Crossbows
Ironbelcher Organ Gun

Triple Organs gave me a bit of pause, but after we both stuck markers in table corners I figured one of them would sit back there and be out of the game, reducing the pressure on me a bit, though Blight don’t care as much. Which is indeed what happened.

The game rolled out in three parts: left Ironclad + ASB backed up by crossbows vs Blight waves + a Lord cheering them on; aggro badgers down the middle with shooting support vs Blight waves + a Lord (+ flying lord); right Ironclad, ‘Serkers, Elementals + Priest tanking in vs Blight, double Engines + El Jefe. Oh, Brutes are hiding in the left corner (holding a point from which they never strayed) and the right corner (backing cautiously away from incoming Berserkers).

The middle quickly resolved itself as aggro badgers were baited in and flanked to death (the flanking Blight are back a bit, those ‘hills’ sucked) -


- and flying lord slammed into an Organ Gun and slowly made his way through both guns and the Warsmith, though it took him the entire game to do it (nothing broke on the first charge).

On the right, Engine fire focused the Elementals hard as they advanced -


- eventually killing them in short order, leaving the Blight to (hindered) charge into the Ironclad and begin the grind:


The double Engines turned their attention to the Berserkers, lathering them up with wounds, and right after this photo the Brute zipped up to block the angry stunties from flanking in …... but as it turned out they didn'’t have to die, as the Berserkers popped after a second volley from the Engines. The Brutes would go on to flank the Ironclad and claim the rightmost pillage marker. Like bosses.

The left flank saw a pattern of me bringing up a Blight horde, it getting mildly shot up my fire from the left + center, me charging the Ironclad for a little damage, then getting wrecked in return. Round one:


Round two:


I luckily held that round, then was popped in Turn 7. However that extra turn meant I could get an Engine within 18"” of those badly bruised Ironclad, which was able to blow them off the table. In the end I claimed 6 markers to his 1, plus a lot of VPs for a heavy win.

NURGLE VICTORY (19-1)

+++

ROUND THREE: DOMINATE

SALAMANDERS


Clan Lord on Fire Drake with Wings – ensorcelled armor
Clan Lord on Fire Drake with Wings – fire oil
Clan Lord on Fire Drake with Wings

Ancients on Rhinosaurs Horde – potion of the caterpillar
Salamander Prime Horde – two-handed weapons, brew of sharpness
Salamander Prime Horde – amulet of thorns
Lekelidon
Lekelidon
Lekelidon

Well fakk me sideways: top table on like no sleep and I’m up against triple flying bastards with breath weapons like whoa and me with not a lot of shooting. I told him I wasn’t really sure how I was supposed to do much to him, he told me not to be like that already!

He got first turn and shoved up (two Drakes are flanking down the left). I responded by canting my battleline, gentle advancing and generally squirting the musk of indecision / fear:


Death Engines rock the left horde (no shields). Other Brute unit is off shot to the right, pretending it isn'’t an easy kill for that green Drake (who is the 6+ DEF one).

Turn 2, both flanking Drakes combo charge the left Brutes and tough Drake on the right gets into breath range of the leading Blight, who indeed suffer:


Stunningly the left Brutes held the double charge!! With no Inspiring to help them out! I don’t respond much, besides getting Blight hordes back into charge range of Salamander hordes – the Rhinosaurs have range to the center but don’t want to charge into that mess alone. Engines again pummel the two-handed Sallies. The champion Brutes counter-charge the fire oil Drake, cuddling it a bit.

Turn 3, the Salamanders without wings continue to sit tight (they don’t back up this turn tho, wanting to retain pressure on the Dominate objective). Those with wings counter-charge the Brutes, hop into the ratty backfield, and flank hard while breathing all over rightmost Blight, who hold but are getting heavy with damage now:


The Brute die :’( Oh, the Lekelidon have been targeting the central Blight when able, but having little effect thanks to Stealthy and pretty horrible dice.

Ratkin respond with violence. The central Blight charge into the two-handed Salamanders and shatter them, as other Blight prepare to trap the Rhinosaurs if they come in. The other two Blight mobilize to either charge or wave into the second Salamander horde (or get flanked/flamed by the tough Drake but whatev). However none of this is going to matter if those Drakes in my backfield can still 20” charge whatever they want, probably in the flank or rear:


A Blight Lord charges into the middle Drake, cracking a wound on it and grounding it (thank you CoC comp!), shortly after both Engines + the boomstick unload into the fire oil Drake, wavering it. Whew.

Turn 4 sees Rhinosaurs finally charge the bashed up central Blight, the disordered Drake flank an Engine, the tough Drake flit backwards – pausing to breath on and kill the rightmost Blight threatening the surviving Primes – and the Lekelidon continue to fluff (they may have helped the Drake drop those Blight).


Thunderous Rhinosaur charge gets bogged down in Blight, failing to rout them despite heavy damage! And then the Drake vs Engine combat hardly touches the Engine, despite 16 decent attaks.

Ratty vengeance follows, with the Rhinosaurs vanishing under 90 bane-chanted Blight attaks:


Surviving Brutes pounce on the Primes to hold them in place and bop them around a bit, as flying Blight Lord swoops in and decapitates a Lekelidon. In the backfield, the flanked Engine charges forward into the fire oil Drake (wavering it), and the other Engine + Chief shoot the other Drake in the face (also wavering it).

Turn 5, those bashed up central Blight are ended, likely by another Drake breath + Lekelidon overkill. The Brutes are also beat down by the Primes. In the ratkin half, those Drakes are finally killed by Engines in combat, with the Chief getting his hands dirty too (to the tune of 4 wounds out of 5 attaks!) Another Lekelidon is killed by that Blight Lord.

Turn 6, he consolidates his position around the central point – unfortunately his Prime horde is so long it does not fit entirely within 12”. The flying Lord is vaporized by Drake breath. In the rat turn, Blights make contact with the last Lekelidon (it vanishes) and the Primes (they might actually have wavered). Currently my Engines + Chief are not within 12” of the center, though they’re close.
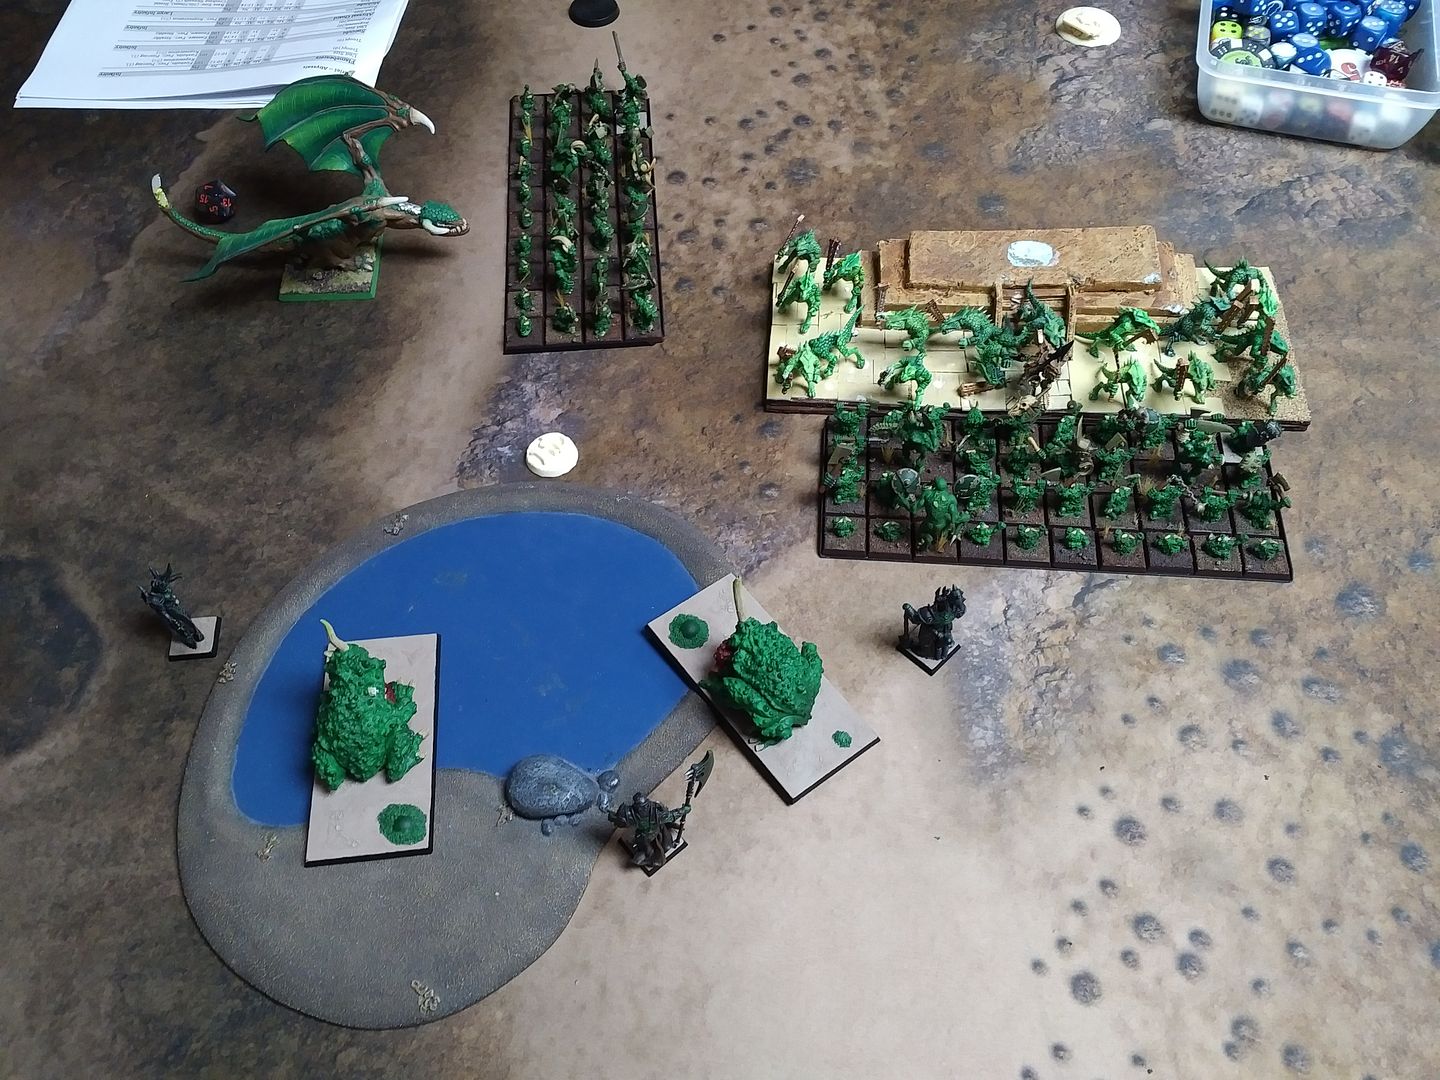

Turn 7 happens! He doesn’t have much to do, but hops his Drake behind the rampaging Blight. More importantly for me I am able to shove Engines up into scoring range, further cementing a win with a hefty VP lead.

NURGLE VICTORY (18-2)

+++ +++

So I somehow managed to go 2-0-1 and come away with $40 for third place O_O (Although after recalculations happened I actually came in fourth, but was allowed to keep the store cred, which had been spent already :P)

The lads talked about getting BBQ … but I was a corpse at this point and had them pack me back into the car for the ride home. Great day of gaming all the same, happy to have powered through XD

For the curious, the field was:

2x Herd
2x Ratkin
2x Undead
1x Abyssals
1x Dwarfs
1x Elves
1x Forces of Nature
1x Rhordia
1x Salamanders

With the top four going to:

1. Rhordia
2. Undead
3. Undead
4. Ratkin

Cheers for reading!

Wednesday, January 13, 2016

+ KINGS OF WARHAMS +

Regular updates, ha!

Anyway I moved shortly after that last post, then entered into a month of holiday stress attak, culminating in a botched NYE raid. But if 2015 was the year of trying to get things done, 2016 is the year of actually doing things. Embarrassingly not quite yet though ...

13 days in and I've made plans, however find myself being pulled in a few directions. I feel compelled to finish a Malifaux crew so I can flip more cards, but am very rarely motivated by the minis. What's saving it for me is thinking in terms of thematic crews, which you'll see some of once my McCabe crew is finally pulled together, hopefully sooner than later.

I'm also setting out on a Ridiculous AOS Army Project, which will be revealed once the minis arrive this weekend. Round-based and everything! Ignoring the fact that AOS isn't really played around here, it should still be a fun, relatively quick project more intended to push my airbrush than anything.

More importantly though, I played my first two games of Kings of War last week, and they were awesome. I did end up busting out my Nurgley Skaven as blight-heavy Ratkin, as I wanted to experience what a bunch of combat units felt like in the game. The answer is pretty good, even if I'm often at a loss for what to do with them all. 8E was so deathstar-centric that the game actually didn't have that many units to move around, unless you went MSU. The change is certainly welcome.

First game was 1500 points of Dominate vs Herd, and while we mostly smashed together on the right flank, I was able to muster enough troops to make a play for the center point. Herd held strong and pulled off the win, but it was surprisingly close and could have swung if his Guardian Champion with Ensorcelled Armor wasn't so damn tough. My list, for the curious:

RATKIN 1500
Blight Lord - bane chant
Warlock
Blight Regiment (20)
Mutant Rat-Fiend
Mutant Rat-Fiend
Weapon Team

A few days later we rematched, this time playing 2000 points of Kill vs Herd. This time I took:

RATKIN 2000
Blight Lord - bane chant, sword of slashing
Warlock - bane chant
Swarm-Crier
Blight Horde (40) - potion of the caterpillar
Blight Regiment (20)
Blight Regiment (20) 
Death Engine - vile sorcery
Mutant Rat-Fiend
Mutant Rat-Fiend
Weapon Team

Battlelines!
 I look forward to doing full KOW batreps in the future, but this won't be the first, sadly. That said it was a stupendous game for the Nurglekin, with Ensnare helping to make the Herd's mediocre dice even worse and my smoking hot dice doing very bad things with my few ranged threats. The lightning barrage was real, routing Great Eagles in a single volley and chunking off wounds hither and yon. But real credit goes to the Death Engine, whose barrage of Piercing(2) fire was instrumental in vaporizing the DEF 6 Guardian Champion who otherwise was posed to flank through at least one unit of Blight. The Engine was so good that I'm afraid it'll be gaining a bit of a reputation around these parts, and as tempted as I am to spam 3+ of the bastards, I have a feeling that would be frowned upon.

All told a crushing victory for the green things, and KOW. Tons of fun - plus I got to flank with my horde! Rolling 60 attaks is nuts, and I realize you can go well higher with a rear charge @_@

Working on Malifaux tonight, stay tuned!

Saturday, January 23, 2010

+ 2010 Battles 03 & 04: Tau & LatD +

These next two battles aren't going to be covered in remotely the same depth as that last GK one, but I figured I should toss them up for completion at the very least. Briefest of background: I rampaged PA last week and got in rematches against two good friends that live down there. First one marks the 8th or 10th game between my Chaos boys and these particular Tau - we're pretty sure I was up 1 win overall, so this would be a chance to pull ahead or tie it up.

Anarchonquistadores vs Tau [2000]

I ran my list from the tournament back in November, and he ran something like this:

Shas'el - frag launcher, plasma gun, meltagun
3 Crisis - plasma, melta, multi
12 FW
12 FW
10 Kroot + 10 Kroothounds
1- Kroot + 10 Kroothounds
5-6 Pathfinders w/ warfish
Railhead
Railhead
3 Broadsides - plasma, targeting arrays

Game: 5 objectives, pitched battle

I figured I had lost this one as soon as five objectives were rolled up vs Tau, and I was pretty much right. How about a by-the-unit summary?

Deathscreamer & 1k Sons - Stumbled painfully slowly towards some pathfinders in a building directly across from them, and were ignored until around turn 3 when the entire unit evaporated under SMS fire, save the 'Screamer. However he was doing his best to be useless, taking a wound from jamming his weapon, having the pathfinders make 100% of their cover saves and finally reaching the objective building on turn 5, when his robots were finally put down. Either he was killed or he simply cowered 6" under the objective at the top of the building.

Plasma Termies - Dropped early and dropped 1 broadside. Were brutally wiped out by a counter-dropping crisis team next turn.

Plasma Dread - After he outflanked all 40 kroot things down the eastern flank and gutted a rhino CSM squad (which killed 10+ kroot hounds on the way down), the plasma dread reserved on and eventually pounded through a building to pounce on one of the kroot packs. Needless to say heavy flamer + being invincible in combat killed that unit and got them off an objective, but it drew the attention of a crisis remnant and a railhead, which were able to drop the dread before he could kill the other kroot unit sitting on another objective. Really, he almost pulled this one back out single-handedly!

Missile Dread - Reserved on and scampered up the hard west flank behind a very tall building, eventually exploding a warfish that he caught stationary. Then he ate broadside railguns and died.

Melta CSM - Boosted their rhino at both railheads, but managed to only knock the gun off one of them before a crisis team arrived. They lost 8 members to AP1/2 fire, though the fist and a meltagunner survived for vengeance! Ish. The meltagun missed @ 1" range, and the fist flopped entirely as well. Both marines were clubbed to death by the tau suits. Guh.

Flamer CSM - Tried messing with some pathfinders in the NE, but were jumped by 40 kroot. As noted they took out over a quarter of them, though twas all for not.

Shooty CSM - Sat on my SW objective, but lost an inordinate number to the 12 FW in a ruin across from them. As in, 12 shots = 12 hits = 12 wounds = 6 dead marines. After that opening volley they hid until game end, when the autocannon marine clinging to the objective (hidden behind a wall) had his point contested by crisis suits.

1k Sons - See above (recap: shot pathfinders in cover, walked very very slowly, died)

Demons - I have no idea what the girls did. I think they helped the flamer CSM kill all those kroot, but were eaten along with them.

Havoks - Stood atop a building and pumped missiles into a railhead for 3 turns (immobilized it only, even with a sterling 3 hits a turn). Then switched to frags and pounded kroot to hell, though their going to ground in hard cover made that a moot point.

Defiler - Nestled down behind a wall and threw shells at those 12 FW turn after turn. Only 1 of 3 templates didn't scatter off (...), but that one mashed ~4 and broke them - they rallied and returned late game, but meh. Note that the defiler took 4 turns of railgun attention from the broadsides, but they somehow kept missing, having their shots cover saved or didn't do anything the defiler cared about. Oh, the defilotron also lobbed a shell at 3 crisis suits standing in the open (OMG SO DELICIOUS!!) ... and scattered away. A horrible trick to tempt me so :(

Oblit - Missed a hammerhead, was instant-deathed in return. Le shrug.

CHAOS LOSS

Well played by the Tau dude, and the CSM were well and truly out-maneuvered this time around. Also as usual I got the feeling of too few guns killing far less often then they need to to work. Ah well.

Second game was against my host's Lost and the Damned army, built using Codex:Orks. Totally awesome army modeling-wise, with quite a bit going for it in game too.

Anarchonquistadores vs Renegades of Sanctus Fornax [2000]

(Wehr, forgive if that army name is off, but I remember something to that extent)

Warboss - mega armor, attak squig
5 Meganobz - kombi-skorcha
Battlewagon - deff rolla, red, big shoota, etc

Zogwort
20 Shootas - rokkit, nob w/ klaw, armor, bosspole
Battlewagon - deff rolla, red, big shoota, etc

Snikrot + X kommandos - 2 burnas
12 Sluggas - rokkit, nob w/ klaw, armor, bosspole; trukk
12 Sluggas - nob w/ klaw, armor, bosspole; trukk
15+ Stormboyz - Zagstruk
Battlewagon - killkannon, etc

Aye, something like that anyway!

Game: 3 objectives, cleanse

So there would definitely be fighting! He won The Roll and deployed very aggressively with all his armor, ready to smash forward and tear chaos faces off. Once again, let's do some unit-by-unit summarizing, as I don't quite want to recreate the game at the moment:

Deathscreamer & 1k Sons - Ork first turn, Zogwort looks at Chaos Lord Severus Gaal, a bit of green lightning tzaps between their eyes ... and Gaal is SQUIGGED! There's a pic of this somewhere, but regardless it was both hilarious and so so so unfortunate. The deathscreamer squig would meet his fate next time the 1k Sons received fire, as Neugog the sorcerer, now acting army commander, pushed the ex-lord into the incoming bullets. The 1k Sons would be pounced by a trukk squad and ripped limb from limb, save for Neugog who stuck around for another turn before succumbing to the choppa maelstrom.

Melta CSM, Flamer CSM & Plasma Termies - I knew that I needed to apply a LOT of force to have a chance at dropping that meganob squad (which is scoring, do note), so the rhino CSM led the charge. Both units stayed in their rhinos after boosting up on either side of the warboss's battlewagon, with the melta boys only able to immobilize it. Both rhinos detonated after being assaulted by various trukk mobs and/or meganobz, and so the CSM fell out and threw themselves in against the nob-star. A lot of average dice later and the CSM lost (both held), after killing a couple nobz and suffering heavy loses. Counter-charges by trukk mobs saw the CSM (and nearly 1/2 my troops) mashed into paste, but only the warboss (1 wound) + 1.5 meganobz had made it out alive. A tactical drop by plasma termies saw off the 1.5 nobz, and when the warboss charged in they crumped him too - for the loss of their own lives, 6 S10 klaw attaks hurt!

Shooty CSM - They had deployed a bit farther back behind some debris with the intent of providing fire support into board-center, but Snikrot's early arrival made things difficult for them. The CSM managed to drop ~4 kommados before they struck, with burnas flopping meaning they drew combat. Next round CSM began to disappear ...

Defiler - ... but the defiler mobilized and jumped on the kommandos, smashing the unit (which couldn't hurt it) even as the last of the shooty CSM were gutted. The demon engine continued to excel at fighting things that can't hurt it, as it was able to twin-heavy flamer the stormboyz (who, forced to deep strike with Zag, failed to make it into combat the turn before) and crump them up nicely. I actually complained about how the defilotron never hits, after which he switched from rolling 0-1 hit as usual to rolling 3-4! So after breaking and catching the kommandos, breaking and catching the stormboyz, the defiler went on to ransack the middle of the board, killing off the trukk boy remnant claiming the central objective. Not too shabby!

Havoks - Bounced krak off battlewagons until Zogwort's shootas turned their guns their way, ripping their meatshields off. For those trying to piece the game together, around this point I had lost ALL of my power armored troops and ALL of my icons ... except for the one on the havoks. With the demons due to hit table ASAP, all available enemy fire went into the havoks, but they held on and summoned the girls down into Zog's squad. After that they switched to frag and slammed missiles into various mobs with varying degrees of success.

Demons - So ladies show Turn 4, and kill Zog's unit handily. From here they waded through a lot of ruin to the eastern objective, being depleted to 2-3 girls at game end. They spent their last turn going to ground out of LoS, handily claiming 1 objective for chaos.

Oblit - Did nothing to Zog's battlewagon despite being ~12" away for 2 turns, then was killed by a trukk boy fist.

DREADS - Ah yes, can't forget the twins. They showed up later than I wanted, and missile dude was less than impressive - walked on and helped the defiler burn up stormies, then helped the defiler a little more by fire frenzy frag missiles into him ... He fragged some mobs too, but was a bit too far east to do much. However plasma dread was on it, powering into the parking lot of busted vehicles in the board center, exploding the boss battewagon sitting on the central objective and holding those few trukk boyz (so the defiler could get to the squishy insides) and then continuing his rampage into the final turn, where he nabbed the killkannon bw too.

In the end, the Renegades held 1 objective with a few trukk boyz, and the Anarcho lads had another with a couple demons. Nothing else was alive except for a couple dreads and defiler playing amongst the vehicle carcasses.

DRAW

Great game with so much carnage. The early squiggening was disheartening, but the demons and dreads once again pulled things out for me!

Painting: N/A
Building: Soulgrinder

Wednesday, January 20, 2010

+ 2010 Battle 02: CSM vs GK +

Technically I've played a lot more than two games this year, but this is the second not involving my Warriors of Tzeentch square-basers, and the first for my thrice-cursed CSM. Up against a fully painted Grey Knights force, for which I took an entirely painted (minus 1 rhino) army of my own ...

Anarchonquistadores vs Grey Knights [1500]

Grandmaster
4 GK Terminators - psycannon
8 GK - psycannon
8 GK - 2 incinerators
Land Raider
Land Raider

vs

Deathscreamer Lord
Plasma Termicide
Dread - PC, HF, XA
9 CSM - IoCU, flamer, AC w/ PF, combi-flamer; rhino w/ XA
10 CSM - IoCU, lascannon, plasma gun, AC w/ PW
6 1k Sons - AS w/ warptime, icon, melta bombs
10-11 Demons
Defiler
Oblit

Defiler was an odd choice, but I've been using him more of late, and figured if the PA GK ever stepped out of their rides I could punish them for it. I definitely forgot about the aegis armor thing though :P

Game: 4 objectives, 'cleanse' deployment

Chaos won The Roll, took it and didn't have it stolen from them.


Defiler View of the Battlefield


Deployment:
GK terminators + grandmaster hung out behind the NW objective ruins, and both power armored GK squads started in land raiders on either side of that ruin.
Shooty CSM took the SE ruin and its objective, with oblit nearby, defiler providing extreme ranged support, 1k Sons + deathscreamer ready to head NW and the fighty CSM rhino likewise ready to go N and W. Dread, termies, demons all in reserve.

Turn One
Rhino rocks north, 1k Sons trip west, lascannon CSM + oblit + defiler all do nothing to the east raider.

GK respond by shuffling their tanks and having the termies stomp into that ruin. Land raider fire manages to immobilize the incoming spiky rhino.

Turn Two


X Marks the Objective


Dread scampers onto the scene mid-table, and plasma suicide team goes for the GK termies over yonder. The 1k Sons stumble forward, the driver of the rhino furiously beats on it but couldn't re-mobilize, the dread is out of spotting distance on the termies (aegisssss), and the termiciders, despite a stunning 5 wounds, only drop 1 terminator after he passes 4 inv saves. Vom-it. Defiler and both lascannons do nothing to the east raider again.


Token movement by GK raiders again. Two termiciders are gunned down by their counterpart's stormbolters (let that sink in: 6 S7 AP2 = 1 dead GK, 8 S4 AP5 + 3 S6 AP4 = 2 dead spikies), and the chainfister is sliced in half by the grandmaster. The termies consolidate back into cover, just in case chaos pulls more shenanigans. The raiders bounce their laz off the immobilized rhino or 1k Sons or something.

Turn Three


The demons decide it's a good time to take the east objective, so summon down and head for it - no rush, there's no way they're losing that thing. 1k Sons stump forward and throw rounds into the termies for no luck (deathscreamer = 4), rhino crew batters away, defiler + lascannon do nothing to the east raider. The dread chooses to fire frenzy rather than shooting the enemy termies, and slams two plasma rounds into the 1k Sons, scattering badly and keeping the automaton closest to him in one piece despite his best attempts. Rage begins to build in the chaos general at this point.


Ordo Malleus deign to move at all, to spite the angry dark marines. Small arms fire knocks down 3 1k Son robots, a raider immobilizes the dread, and the other one splatters the oblit.

Turn Four


The fighty CSM finally get out of their busted rhino and run for the SW objective, which unfortunately will bring them in fire frenzy range of the dread ... The 1k Sons have achieved range on the termies, so hang out for now, spraying AP3 bullets just because (deathscreamer = 2). The girls easily nab the eastern objective, CSM lascannon and defiler boomer do nothing to that east raider as usual, and the dread's template scatters off the termies.

And then the Grey Knights make their move! East raider dumps its squad into the NW objective, and west raider slams it south and disgorges its delicious power armored insides into the SW ruin. The deathscreamer takes a wound from somebody's bolter, a robot falls (leaving just 1 + sorcerer + lord), and members of the fighty CSM squad begin to evaporate under elite stormbolter fire and the attention of various raiders.

Turn Five


The forces of chaos are well aware at this point that the game is officially a draw, and has been for some time, but they decide to shoulder on. Then the dread fire frenzies on cue, looking at the poor CSM wanting nothing more than to pass by and finally punch some Imperials ... So the fighty boys back off and climb into the shooty marines' bunker, and let the dread fire frenzy into the GK squad, dropping 3 marines! Result! The remnants of the 1k Sons climb into the rhino, which remobilizes at long last! Sadly the deathscreamer had previously decided to go rambo and shoot down some of the power armored goody goods sitting on the NW objective - you know perfectly well what he rolled for shots, but the jam is saved by his inv. Ridiculous. The CSM lascannon did nothing as usual, and the defiler sneakily shot for the corner of the east raider so as to splash aegis-shielded marines with his template, but the scatter was immense to say the least.

Happily sitting on 2 objectives at this point, the GK are content to mostly just mess with the chaos guys until time is called. The termies scamper forward under cover of the east raider, the west raider gets LoS on the dread and detonates him, and a bunch of fire reduces the fighty CSM to the AC + 2 friends. And the deathscreamer dies in a blaze of stormbolter fire, with a nauseating feeling of deja vu at yet another death to small arms.

Turn Six


The game continues, ish. The rhino bearing the 1k Sons slams it 12" for the NW objective, but are so very very far away. And the lascannon tries for one more shot into the raider, but continues to suck. 6 turns of nothing, wow. The defiler mobilizes to bring some spotting range on the NW ruins, but his template either is out or scatters badly. With GK being fearless he would have had to kill ALL of them, which wasn't going to happen.


Termies stroll along, raiders shoot things, etc. Mostly, the defiler lived! Pyrrhic victory!

Objective Round Up


DRAW

A bit of a non-starter really, though he did play it as intelligently as possible, being cagey and staying at range until a late game objective grab. I don't believe he could have gotten a win with just 2 troops, without being very very aggressive, which would have brought him into the Chaos Zone of Dismemberment. True, a frustrating game for me, but my army struggles against even 1 raider - and this list had 2 lascannons, twice as many as usual for me. For once the havoks would have been better than the defiler, but I'm running the defiler for all comers more so meh.

Two more games to go from last weekend: 2k rematch vs Tau, 2k throwdown vs Orks Counts As Madness!

Painting: N/A
Building: Soulgrinder